Frame Buffer
The Frame Buffer pane allows users to configure and view information about the camera's Frame Buffer.
Frame Buffer Bar
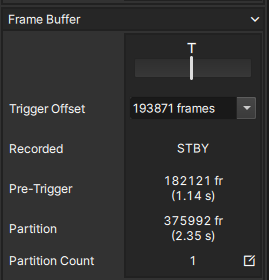
At the top of the pane, the Frame Buffer Bar provides a visual representation of the current partition's circular frame buffer.
Above the bar, the Trigger position is indicated with the 'T' symbol. The portion of the bar to the left of the indicator represents pre-trigger frames, while the portion of the bar to the right represents post-trigger frames. The vertical slider bar also indicates the beginning of post-trigger frames. This is usually conincident with the Trigger position, except in the case of a Trigger Delay.
When recording of a Take is started, the bar will fill to the left beginning from the Trigger indicator to represent the recording of any pre-trigger frames. When the Take is triggered, the bar will then fill from the Trigger indicator to the right to represent the recording of any post-trigger frames.
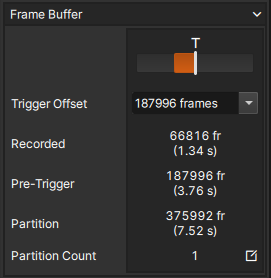
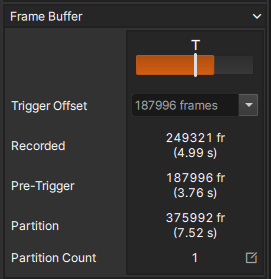
Trigger Offset
The Trigger Offset defines the offset of the trigger position from the end of recording, or the number of post-trigger frames to be recorded to the current partition's Frame Buffer. The Trigger Offset can be set using either the Trigger Offset slider, within the Frame Buffer Bar, or with the Trigger Offset control.
Slider
The Trigger Offset slider allows a visual adjustment of the trigger position within the frame buffer, and the ratio of pre-trigger to post-trigger frames. Dragging the slider left, increases the number of post-trigger frames while decreasing pre-trigger frame count. Dragging the slider to the right has the opposite effect.

Control
With the Trigger Offset control, the desired trigger offset can be input manually, or by using the dropdown list to select from pre-calculated values which represent all pre-trigger frames, a center trigger, or all post-trigger frames.
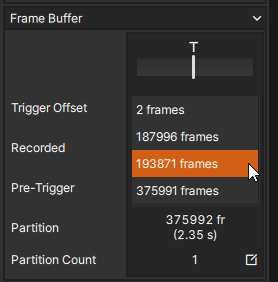
The minimum trigger offset is 2 frames.
Trigger Delay
When the Trigger Offset exceeds the number of frames in the partition, this effectively creates a Trigger Delay. Therefore, after the Take is triggered, the number of frames in excess of the partition size will be recorded and discarded before beginning to record the post-trigger frames.
If a Trigger Delay is desired, use the Trigger Offset control to set a value greater than the partition's total frame count. After a Trigger Delay is created, the slider within the Frame Buffer Bar will be separated from the Trigger indicator. The area of the bar to the left of the slider now indicates the frames to be discarded. Dragging the slider can be used to change the extent of the delay.
Recorded Frames
The Recorded field indicates the total number of frames which have been recorded to the active partition. The duration of the recording is also indicated based on the current frame rate.
Pre-Trigger / Delay Frames
The Pre-Trigger field indicates the number of pre-trigger frames allocated to the frame buffer. This value is adjusted based on the set Trigger Offset. The duration of the the pre-trigger portion of the buffer is also indicated based on the current frame rate.
When the Trigger Offset is large enough to create a Trigger Delay, there are zero pre-trigger frames, and this field is replaced with the Delay field. The Delay field indicates the number of frames to be discarded before beginning to record the post-trigger frames. The duration of the delay is also indicated based on the current frame rate.
Partition Size
The Partition field indicates the size, or total number of frames in the partition. The duration of the partition is also indicated based on the current frame rate.
Partition Count
The Partition Count field indicates the number of segments the frame buffer has been partitioned into. This allows users to capture multiple successive Takes.
To modify the Partition Count, click the ![]() button to
the right of the field to open the Partition Count dialog.
button to
the right of the field to open the Partition Count dialog.

Partitioning the memory can help streamline the recording workflow by removing the need to save and/or delete the current Take before starting the next, particularly when used in conjunction with the Autosave feature.
-
The number of partitions cannot be modified if ANY of the current partitions contain data.
-
All recorded Takes must be deleted before modifying the partition count.
-
After repartitioning, the Trigger Offset is not automatically adjusted. Therefore, the previously set value may no longer be desired and will need to be modified.