Acquisition
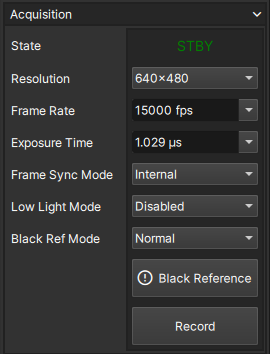
The Acquisition pane is used to control and monitor the sensor settings, frame synchronization mode, black reference calibration, and for recording and triggering Takes.
State
The State field indicates the current acquisition state of the camera. When the Frame Buffer is partitioned, the active Take being recorded is also indicated.
| State | Display Name | Definition | Icon |
|---|---|---|---|
| Standby | STBY | Not recording, all partitions finished recording or deleted | |
| Recording | REC | Actively recording frames to current partition's continuous buffer, ready for trigger | |
| Triggered | TRIG | Current partition triggered, pre-trigger frames recorded, actively recording post-trigger frames |
Resolution
The Resolution control sets the resolution (width x height) of frames acquired by the image sensor. The desired resolution can be selected by using the dropdown list of possible resolutions.
When the Resolution is modified, the camera may automatically adjust the Frame Rate and Exposure Time to be compatible.
It is possible to change the Resolution when the camera is recording before it is triggered. Doing so will reset the buffer of the current partition and any recorded frames will be lost!
Frame Rate
The Frame Rate control sets the rate at which the image sensor acquires images in units of frames-per-second (fps). The desired frame rate can be input manually, or by using the dropdown list to select from a subset of frame rate options for the currently set Resolution, always including the maximum and minimum frame rate. When the Frame Sync Mode is set to external, the control is disabled and displays the detected frame rate.
When the Frame Rate is modified, the camera will automatically adjust it to the nearest possible frame rate if necessary. The camera may also automatically adjust the Exposure Time to optimize performance.
Exposure Time
The Exposure Time control sets the duration for which the image sensor is exposed to light for each frame in units of microseconds (µs). The desired exposure time can be input manually, or by using the dropdown list to select from a subset of possible exposure times for the current Frame Rate, always including the maximum and minimum exposure time.
When the Exposure Time is modified, the camera will automatically adjust to the nearest possible exposure time.
Frame Sync Mode
The Frame Sync Mode control sets the source of the camera's frame sync signal. These signal edges indicate to the image sensor when to capture frames.
| Mode | Definition |
|---|---|
| Internal | Frame sync is generated internally at the configured Frame Rate |
| External | Frame sync edges are sourced from an external input |
External Frame Sync
The frame sync signal can be input via a User I/O from an external source, such as another camera, in order to synchronize the capturing of frames.
Only one User I/O can be configured as a frame sync input.
The maximum allowable external frame rate is dependant on the current configured Resolution and Exposure Time. If the input external frame sync signal violates this rate, any additional edges will be ignored and the achieved frame rate will be reduced compared to the actual frequency of the signal.
In external frame sync mode, the Frame Rate control is disabled and will display the detected frame rate. The detected frame rate will be displayed in red if it exceeds the maximum allowable rate.
Low Light Mode
Low Light Mode provides a convenient means to temporarily acheive a higher exposure level to allow for easier framing and focusing during applications with low illumination and high frame rates.
To enable Low Light Mode, select 'Enabled' from the dropdown. This will automatically set the minimum Frame Rate, and increase the Exposure Time to the maximum (by default).
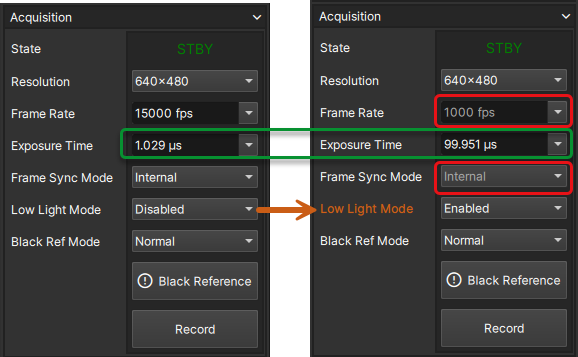
The Low Light Mode field highlights in orange to indicate the feature is enabled.
![]()
The Frame Rate and Frame Sync Mode are disabled when Low Light Mode is enabled (shown in red). However, users still have the option to adjust the Exposure Time (shown in green) in case the maximum causes the image to be oversaturated.
To disable Low Light Mode, select 'Disabled' from the dropdown. The settings for Frame Rate, Exposure Time, and Frame Sync Mode will restore to the previously set values.
Any changes to Exposure Time during Low Light Mode will be retained the next time Low Light Mode is enabled. These changes apply only during Low Light Mode and do not affect the original Exposure Time set while Low Light Mode is disabled.
Black Reference Mode
The Black Ref Mode control sets the black reference calibration algorithm to use.
| Mode | Definition |
|---|---|
| Normal | Standard method for obtaining a good black reference |
| Advanced | Advanced method which results in lower-noise images |
When in external Frame Sync Mode, the Black Reference Mode can only be set to Normal.
Use Advanced black reference calibration whenever possible for the best results.
After a Take is saved to the SSD or a SLOW file, the Black Reference Mode cannot be changed
Black Reference Button
The Black Reference Button performs a new black reference calibration. During this time, live frames will be paused, and other camera actions will be queued but not executed until the calibration is complete. The process takes ~10 seconds.
A new black reference is needed whenever the acqusition settings for Resolution, Frame Rate, or Exposure Time are changed. The button will display a warning symbol as a reminder that a setting has changed which requires a new black reference.
![]()
The E9 can store up to 64 unique black references simultaneously. When a Take is triggered, the black reference slot it is utilizing will be locked until the Take is deleted. If a new black reference is not performed, susbequent Takes will share the same black reference slot. If all slots are utilized and a black reference is attempted, a warning will be displayed, indicating that some Takes will need to be deleted to free up new slots before a new black reference can be obtained.
Record / Trigger Button
The Record / Trigger Button controls the camera's acquisition state. The button will display the action that can be taken based on the current acquisition state.
| State | Button | Function |
|---|---|---|
| Standby | Start recording frames to next available partition | |
| Recording | Trigger the current Take / partition | |
| Triggered | Stop recording post-trigger frames |
Pressing the record button when all of the Take partitions are full will result in a warning popup. This will not overwrite any previously recorded images.
