SSD System
Every E9 includes one 1.6TB U.2 SSD drive mounted to a proprietary SSD mounting tray, along with a USB drive adapter.
SSD Tray
All drives are required to be attached onto the SSD tray to be installed into the camera. It is attached by four M3 x 4mm flat head screws using a #1 Philips driver. Screws are torqued to 8 in/lbs (0.9039 N-m) and extras are provided in the shim kit. Drives included with an E9 system arrive pre-mounted.
SSD Drive
Additional drives can purchased off-the-shelf. Pharsighted recommends selecting a drive from the verified list. Drives provided directly by Pharsighted will arrive correctly formatted and ready for use. 3rd party drives will be required to be formatted to the exFat files system prior to use.
When clearing an SSD of data, delete all content or preferably reformat the drive using the SLOW software.
-
It is a best practice to dedicate the SSD drive to the E9 camera, and not use it for file storage from other sources.
-
Only write files to the SSD directly from the camera. Avoid placing files other than SLOW files on the SSD
Verified Drives
| Model |
|---|
| Micron 7400 MAX |
| Micron 7450 MAX |
| Micron 7500 MAX |
| Micron 9300 MAX |
Insertion
-
SSD’s taller than 15mm will not fit the socket. This is the maximum allowable height by the U.2 standard.
-
Always close the door fully after installing a drive, especially if the camera is moving during operation.
- Open the SSD door at the rear right side of the camera by (A) pulling back on the door tab and (B) rotating the door outward
- Insert a drive mounted on the tray, connector first, into the socket by aligning the rails on the tray to the slots in the camera
- Push until the drive seats with the connector in the E9.
- Close the door by rotating into position and pushing forward. If the door does not close, the drive is not seated completely.
The SSD LED will be amber while the drive is being enabled, and will turn green once ready, or blue if unformatted.
Formatting
SSDs are configured at the factory with a 4KB block size for maximum performance. SSDs sourced third-party are typically configured with smaller 512B block sizes, which results in slower save speeds.
SSDs can also be reformatted as exFAT on a PC, however, it is recommended that all new third-party SSDs be formatted in-camera to ensure optimal write performance.
SSD Operation
Using the SLOW software, takes can be manually saved to the drive by choosing the respective destination within the Save Dialog, or the Autosave feature may be used.
Takes can be viewed using the 'Open SDD Take' button within the SSD pane.
Removal
Physically removing the drive from the camera before unmounting from the software may result in data corruption!
-
To unmount the drive, use the
 'Eject' button found within the SLOW software SSD pane.
 -
Once unmounted from the SLOW software, simply pull the drive out by the tray handle to disengage the connector.
Always remove a drive from the camera during storage or transportation.
LED
| Color | State | Description |
|---|---|---|
| OFF | Removed / Ejected / Error | No SSD inserted or SSD error |
| Green | Ready | Ready and idle, safe to remove |
| Amber | Mounting / Ejecting | Mount or eject in progress |
| Red | Saving... | Saving to SSD in progress |
| Blue | Unformatted | Drive is unformatted |
| Magenta | Formatting... | Format in progress |
USB3 to U.2 SSD Adapter
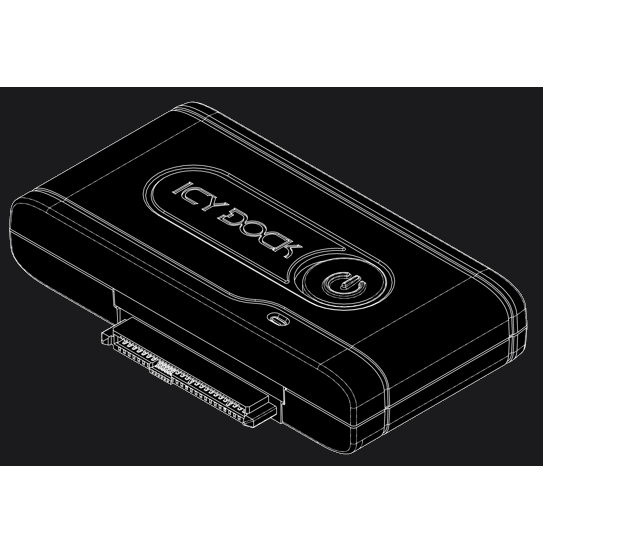
The USB drive adapter allows an SSD drive to interface with a ‘Windows’, macOS’, or ‘Linux’ environment.
The adapter uses the USB 3.2 Gen 2 interface that can provide transfer speeds up to 10 Gbps, giving you the ability to transfer large data files in seconds. The connection is USB-A or C, with a C to C connection being preferred (both cables included).
A 12V power supply is included and required to power the U.2 SSD and adapter.
There are additional rubber feet included in the shim kit.
Adapter Operation
-
Ensure the dock is in the OFF state (power button to the left, red border)
-
Connect the 12V power to the adapter
-
Using the supplied USB-A or USB-C cable, connect the dock to your computer
-
Insert the E9 SSD accessory into the adapter
-
Power on the adapter by sliding the power button to the right (green border)
After a few seconds, the drive should now be visible within your operating system's file explorer and ready to transfer files.
The LED below the power button on the adapter should flash blue repeatedly while files are being transferred.
For cameras shipped before Oct. 2024, the U.2 to USB3 adapter may not detect newer U.2 SSDs (such as the Micron 7450 or 7500 series). If desired, please contact Pharsighted for assistance upgrading the adapter firmware
USB Adapter Part Info
Manufacturer : ICY DOCK
Model # : EZ-Adapter Ex MB931U-1VB R1